Welcome to Rongda Machinery Co., Ltd


CALL TO SCHEDULE YOUR FREE!
+8615861110996
sharon@lyrdgj.com
sharon@lyrdgj.com
Toggle Navigation
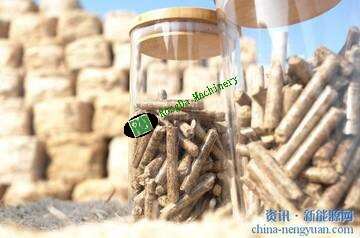
With the growing interest in sustainable energy, wood pellets have become a popular choice for home heating and industrial energy needs. These eco-friendly, efficient fuel sources are made from compressed organic materials like sawdust and wood chips. The good news is, you don’t have to buy pellets—you can make them at home, saving money and helping the environment. In this guide, we’ll take you through the process of making your own wood pellets, from selecting the right materials to using a pellet mill for production.
Before we get into the details, you might wonder: why should you consider making your own wood pellets? Here are some key reasons:
Purchasing wood pellets can become quite costly, especially during high-demand seasons. By producing your own, you can significantly reduce your fuel costs and ensure you always have a supply on hand when needed.
By using locally sourced, renewable wood materials, you’ll reduce your carbon footprint. Making your own pellets also supports sustainable forestry practices and minimizes the environmental impact of commercial pellet production.
Making your own pellets gives you complete control over the type of wood and any additives used. This allows you to customize the fuel’s burn quality, efficiency, and even the aroma produced by your stove or boiler.
Wood pellets can be made from wood waste products like sawdust, chips, and even agricultural residues. By turning these waste materials into fuel, you help reduce environmental waste while creating a valuable energy source.
To get started with making your own wood pellets, you’ll need some basic materials and equipment. Here’s a list of everything you’ll require:
The primary ingredient for wood pellets is sawdust, usually a by-product of woodworking or milling operations. Other materials like wood chips, bark, or even agricultural waste (e.g., straw or corn stalks) can also be used. Be sure to choose dry, clean materials free from contaminants such as plastic, metal, or dirt.
The centerpiece of the pellet-making process is the pellet mill. This specialized machine compresses your raw materials into compact pellets. Pellet mills come in various sizes, so choose one based on your production needs. For home use, small pellet mills are sufficient, producing anywhere from a few pounds to several hundred pounds of pellets per hour.
Wood materials need to have the right moisture content (typically between 10-20%) to form good-quality pellets. Too much moisture can prevent proper binding, while too little can cause cracking. A drying system, such as a rotary drum dryer, or even a simple air-drying setup, is essential to achieve optimal moisture levels.
Most wood types contain enough natural lignin to bind pellets together. However, certain materials like agricultural waste may need additional binders such as wheat flour, cornstarch, or molasses to help form the pellets. This step is optional and depends on the materials being used.
After pelletizing, the pellets are hot and soft. To avoid breakage and ensure they’re durable, they need to be cooled. A cooling system, such as a cooling conveyor or air-drying setup, helps to cool down the pellets to a manageable temperature.
Once your pellets have cooled, they need to be stored properly to maintain their quality. Store them in dry, well-ventilated spaces to keep them from absorbing moisture. For distribution or sale, secure packaging in plastic or cloth bags will ensure they remain dry.
Now that you have your materials and equipment, let’s walk through the pellet-making process:
Start by sourcing your wood materials. Sawdust is commonly used, but wood chips, shavings, and even agricultural waste like straw or corn stalks can work too. Ensure the materials are clean, free of contaminants, and ground to a fine consistency (less than 3mm in size).
To make strong pellets, your raw materials need to have a moisture content between 10-20%. If the materials are too wet, they won’t bind properly. If they’re too dry, they may crack. You can use a rotary drum dryer for large batches, or simply air-dry smaller amounts in a well-ventilated area.
Once your raw materials are dried and ready, feed them into the pellet mill. The mill compresses the material under high pressure, causing heat to melt the lignin in the wood, which binds the particles together and forms pellets.
As the raw material passes through the die in the pellet mill, it forms cylindrical pellets. These pellets will be hot and soft when they come out of the mill, so ensure they are monitored carefully. Overheating or too much pressure can cause them to break apart.
After forming, your pellets need to cool down to become hard and durable. You can use a cooling conveyor or simply allow them to air-dry in a well-ventilated area. This is an important step to ensure that the pellets do not remain soft or fragile.
Once cooled, it’s time to store your wood pellets. Make sure to store them in a dry area to prevent them from absorbing moisture, which can degrade their quality. If you're selling or distributing them, packaging them securely in plastic or cloth bags will help protect them.
Here are a few tips to ensure your wood pellets are of the highest quality:
Different wood types have varying densities and burning properties. Hardwoods like oak and hickory produce denser, higher-energy pellets, while softwoods like pine burn hotter but faster. Choose the right type of wood based on your heating needs.
Ensure your raw materials stay within the optimal moisture range. This is crucial to ensure that the pellets bind properly and burn efficiently.
The quality of your pellet mill directly affects the quality of your pellets. Be sure to choose a reliable pellet mill that suits your production scale—whether it’s for personal use or small-scale business production.
After making your first batch, test the pellets in your stove or boiler to ensure they burn cleanly and efficiently. If they crack or crumble, you may need to adjust the moisture content or materials used.
Creating your own wood pellets is a rewarding and cost-effective way to reduce heating costs, recycle waste, and contribute to a sustainable future. With the right materials and equipment, you can easily make high-quality wood pellets at home. Whether for personal use or small-scale business purposes, DIY wood pellet production offers numerous benefits. So, why not start today? Explore the world of homegrown, eco-friendly energy and enjoy the warmth and savings that come with it!